Friday, 15 June 2012

My trip to Michaels


I've always passed by a Michaels while in car and also heard good things about it from my cousin but I've never actually been inside until today.  When I stepped in there, it was a candy store for people who love arts and crafts! They carried everything from baking supplies to art material storage units.  The only downside was that I found everything to be a bit pricey but I still managed to find some good deals! I bought a mystery pack of stickers and four rolls of ribbons. I generally like to shop for deals because I believe in getting the full bang for my buck!


mystery sticker pack for $9.99

my favourite #
my favourite #2


 At Michaels, I bought a mystery sticker pack for $9.99 (originally $19.99) and it was definitely worth every penny that I paid for it! The pack came with 14 sets of stickers and my favourite ones are the two posted above.  Although, I may not have use for all the stickers but these stickers are very nicely made and when sold separately, they usually go for $4-7 per set at Wal-Mart, Zellers and some arts and craft stores.
Another awesome deal I found today are the ribbons (ribbons are very handy for decorating scrapbook pages and also forming the frame for pictures).  I usually buy my ribbons at the dollar store cause they are the cheapest there but today, there was a promotion at Michaels and the ribbon was half price.  At the dollar store, I usually pay $1 for 3 yards of ribbon and today, I paid $2/roll (regularly $4/roll)but each roll was 10 yards long which makes it even cheaper than the dollar store and their selection at Michaels was amazing!

Monday, 4 June 2012

most recent piece for my travel album


I did this piece for a trip that Jackey and I took to Vancouver last Septemeber to visit my family.  For my travel pieces, I generally like to save our boarding passes so I can include them as a little decoration in addition to the pictures.  For this one, I also took a few of the free travel guides off the streets and at the malls so that I could use the maps for the background as opposed to using patterned paper all the time.  This way, the design also looks more coherent throughout because it's a travel theme and it's based on Vancouver.

If you do intend on creating a travel themed scrapbook then you should definitely consider buying some extra postcards and picking up a few of those free travel guides to help decorate your pages

Saturday, 2 June 2012

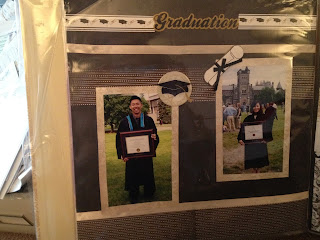
one of my latest creations


Currently, I am working on two scrapbooks- one that includes all the travelling that Jackey and I have done in the last 5 years and another which is based on special occasions.  In the pictures above, is a piece that I did yesterday night for our graduation for the special occasions scrapbook.

I always knew that I wanted to do a page on our graduation so I went to Winners and Homesense and bought some graduation stickers and themed paper.  I used a basic black background (i tend to use solid colors for the background so that any other design I add to it will stand out more) and cut frames for each of our pictures.

For the right hand side, i decided to separate our graduation photos into two sets- the 3 pictures on the top are from Jackey's graduation and the bottom 3 are from mine.  I had some trouble deciding on the layout of the pictures and the extra designs at first but once i started moving the pictures around, I created a mental picture of what I want the layout to look like.

Both pages were pretty much made from scratch as I added different pieces of patterned paper around as the borders for both the page and the pictures.  This is definitely one of my favorite pieces!

Some Tips for first time scrap-bookers

TIPS FOR SCRAP-BOOKING

Best places to pick up scrapbook material: Homesense (my favorite place to go because they carry high quality paper and nice albums for a third of the price of Chapters ), Dollarama (great for stickers and ribbons but not the paper), Wal-Mart (good for stickers and basic tools like hot glue guns, glue sticks, markers, etc)

First, If you would like to start scrap-booking then the most important thing you should do is come up with a theme that you want to base the scrapbook on.  It's much easier to make a scrapbook and keep track of the materials you want to buy when you have a theme or topic.  This way, you can start off by buying materials that is useful for your theme.

Next, don't give up just because you're stuck on ideas and don't be afraid to check out other people's work for inspiration.  I've sat there for hours before trying to think of a creative layout for my work but wouldn't be able to think of anything good.  So, if you're stuck, then don't hesitate to check out the back of your scrapbook packages or go on-line to find some inspiration.  Much like writing, you need to physically start playing with the layout by placing different pieces of patterned paper together, etc

One of my favorite DIY costumes- Mario and Luigi

This Mario and Luigi costume is one of my favourite DIY pieces of all time! I made it for the Halloween of 2010 for me and my boyfriend, Jackey, and customized it so that the one for me (Mario) was more feminine.  When I made this outfits, I had also added a little tweak- the upper part of the overalls come off so that after halloween, we could wear it as regular pants- perk for making your own costumes.

These costumes were not hard to make at all but it did take a lot of time, especially because I wasn't all too great with the sewing machine.  It took me about 2-3hours/day for about 5 days to make the overalls and sew the logos on the caps.  I found that it was definitely worth it because the overall cost of the uniforms only came up to $50 for both costumes together which is much cheaper than getting it in store!

However, if you do find this one to be difficult because you prefer not to use a sewing machine then be sure to check out the simpler costumes that I will be posting up!

HOW TO MAKE IT: 

Materials: roughly about $50
- blue corduroy fabric from fabricland- about $ 25 for both pieces (about 3 meters of fabric)
- t-shirts- $6.95 each from H and M
- caps from random store- for $2/each and also another $2 for the felt to make the logos
- white gloves from Wal-Mart- $0.97 each
- pattern for the pants from fabricland- $4

Tips:
- you will definitely need a sewing machine because it would take probably 4 times longer to sew it by hand and it would also tear much easier, but it doesn't take much skill, you just need to know how to sew straight
- it's much easier to sew the pants if you have a pattern (patterns are basically outlines of a generic style or piece of clothing that you can pin to the fabric to guideline the cut-out of the piece you want to make)
- t-shirts from places like H and M are pretty cheap so it's definitely worthwhile to buy it than to make it
- before you buy the fabric and begin to sew, make sure you have thoroughly thought about the design of the piece- especially the little customizations and tweaks you want to add

PROCESS: make sure you have bought all the materials
Making the overalls: I couldn't find any patterns to make overalls so I just bought patterns to make the pants and free-handedly cut out the upper part of the overalls
1) open the pattern, cut along the lines of the size you need then follow the instructions and pin it along the fabric (with pinning needles)
2) after you've cut out the pieces, sew the loose pieces together with a sewing machine
3) if you wish to insert a waistband then simply fold the fabric inwards (fold must be wide enough to fit the piece of elastic you bought) and sew it
4) cut out the upper shape of the overalls and also straps; now sew the all three pieces together accordingly to how you want it to fit (tip: pin everything together first before you actually sew anything to get a preview)
5) cut some small circles out of yellow felt and sew it at the upper corners of the overalls ( sew the buttons with yellow thread in the shape of an X across the button for a cartoon effect)

Making the hats:
1) after you have bought the caps (try to buy it for as cheap as possible), simply take a starbucks hot drink lid or a can or anything that is round and about that size, trace it along white felt and cut
2) On red felt, cut out the letter M and on green felt, cut out the letter L
3) sew everything together (but first, sew the letter onto the circle before sewing it on the hat)


A little about me and this blog....


Last summer, when my cousin was staying over at my place, she introduced me to an amazing and fun hobby- scrap-booking.  As I looked through her albums and pieces, I was inspired and determined to start my own!  It is definitely a very satisfying hobby for me because every time I finished a page, I would go through my entire scrapbook again to review my memories and appreciate my artwork. When I used to mention scrap-booking to my friends and co-workers, they would automatically think of it as an activity for the "elderly"- much like knitting.  However, when they actually see the pages that I have put together, they are usually surprised by how cool it can look.  

Another hobby of mine since I was young is sewing. Although, I don't have the most amazing sewing skills but I find that it's all about being creative and determination in order to sew something "wearable" rather than technical sewing skills.  Unfortunately, as a full-time university student, I haven't had the opportunity to dedicate entire days to designing and sewing clothes (since I am working on a second undergraduate degree, I haven't had time in the last 7 years).  Therefore, the one time a year that I will definitely design and sew outfits is during Halloween, because I think that costumes are way overpriced (sometimes poorly sewn) and it's actually very simple to make.  For the past 3 years, I've been making Halloween costumes for me and my boyfriend and I've always received positive comments, so I would actually want to encourage others to make their own as well!


Yesterday night, as I finished another page for my scrapbook, I suddenly thought of creating my own blog so I could share my scrapbook and costume/clothing creations with people and also encourage them to start their own projects by offering tips and sharing ideas.  I will be updating this blog regularly with pieces of my work and also a quick explanation on how to do it yourself, so hopefully, you will enjoy this as much as I do!